
View Demo | Another Demo
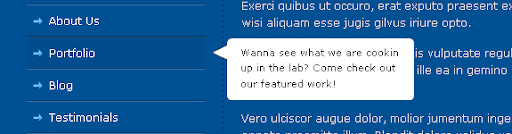
Side Navigation Tooltip and Popup Bubble !
The tooltip used on my blog was actually from http://jqueryfordesigners.com/coda-popup-bubbles/ and the tutorial from http://www.sohtanaka.com/.Step1 – Create Wireframe
We will first start by creating the wireframe of the side navigation.
HTML”
<ul class="sidenav">
    <li>
        <a href="#">Home</a>
    </li>
    <li>
        <a href="#">About Us</a>
    </li>
    <li>
        <a href="#">Contact</a>
    </li>
</ul>
CSS:
ul.sidenav {
    float: left;
    margin: 0;
    padding: 0;
    width: 200px;
    list-style: none;
    border-bottom: 1px solid #3373a9; /*--Bevel Effect--*/
    border-top: 1px solid #003867; /*--Bevel Effect--*/
    font-size: 1.2em;
}
ul.sidenav li {
    position: relative; /*--Add a relative positioning--*/
    float: left;
    margin: 0;
    padding: 0;
}
ul.sidenav li a{
    border-top: 1px solid #3373a9; /*--Bevel Effect--*/
    border-bottom: 1px solid #003867; /*--Bevel Effect--*/
    padding: 10px 10px 10px 25px;
    display: block;
    color: #fff;
    text-decoration: none;
    width: 165px;
    background: #005094 url(sidenav_li_a.gif) no-repeat 5px 10px;
    position: relative; /*--Add a relative positioning--*/
    z-index: 2; /*--z-index allows the popup to tuck underneath the nav--*/
}
ul.sidenav li a:hover {
    background-color: #004c8d;
    border-top: 1px solid #1a4c76;
}
Step2 – Styling Tooltip/Popup
Then we proceed to adding an extra div within the list item with a paragraph tag.
HTML:
...
<li>
    <a href="#">Home</a>
    <div><p>Go home!</p></div>
</li>
...
CSS:

The div parent contains the top portion of the bubble image, and the paragraph carries out the bottom half of the bubble. This way the tooltip bubble can be flexible in size.
ul.sidenav li div {
    display: none;
    position: absolute;
    top: 2px;
    left: 0;
    width: 225px;
    font-size: 0.9em;
    background: url(bubble_top.gif) no-repeat right top;
}
ul.sidenav li div p {
    margin: 7px 0;
    line-height: 1.6em;
    padding: 0 5px 10px 30px;
    background: url(bubble_btm.gif) no-repeat right bottom;
}
Step3 – Activating Tooltip with jQuery
From here we will add a simple hover event using jQuery.
jQuery:
<script type="text/javascript">
$(document).ready(function(){

    $("ul.sidenav li").hover(function() {
        $(this).find("div").stop()
        .animate({left: "210", opacity:1}, "fast")
        .css("display","block")

    }, function() {
        $(this).find("div").stop()
        .animate({left: "0", opacity: 0}, "fast")
    });

});
</script>
|
Loading...
|
Comments :
Post a Comment
Enter any comments